TheSims Skins Tutorial
Convert
Dragonflies and damselflies, which are usually smaller, have wingspans of about 1-8 inches.
The first step is to export your finished mesh as an OBJ. This is slightly different for each modeller, but most are under and Export menu.
MS3D: On the File menu, choose Export, then Wavefront OBJ... MS3D v1.3.2 has a bug. When exporting an OBJ, it gives it the extension .3DS Just allow it to give it that extension, then manually change it in Explorer.
Note: The following is for an entirely new mesh. Instructions for converting a modified existing mesh will follow.
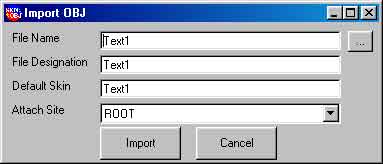
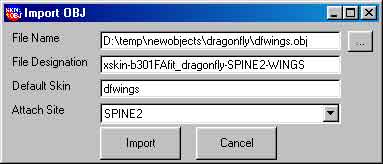
Run Skn->Obj (skn2obj.exe). Click Import OBJ. The following Dialog will appear.
Click on the ... button and choose the file you exported from your modeller.
The file designation is the final filename without the SKN extension. Ours is xskin-b301FAfit_dragonfly-SPINE2-WINGS. If you already understand the naming conventions (covered in Chapter 4) then you can name it properly. If you don't know what to name it yet, put Dragonfly or some other properly descriptive word.
The default skin is important. This should be the name of the texture you created in Chapter 2, but without the BMP extension. We'll use dfwings.bmp, so it's dfwings
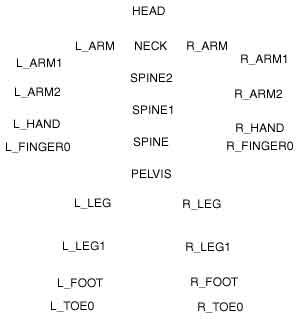
The attach site is VERY important. This cannot be changed without re-converting. For the wings, we want to use SPINE2 (Upper back, just below the neck)
When you attach to a spot on the body, the mesh that is attached moves when that spot moves.
Now, on the File menu, click Save As. If you've figured out the name, use that. (Ours is xskin-b301FAfit_dragonfly-SPINE2-WINGS.skn) If you haven't, use the word you used in File Designation earlier.
Dragonflies are different from damselflies in that they hold their wings out from the body when at rest. Damselflies rest with their wings held together over their backs.
Notes on Modifying an existing mesh (SKN)
Run Skn->Obj. Select File, Open. Choose the Skn you wish to modify. Choose File, Save as. Save the project (SPJ) as whatever name you wish.
When you save the SPJ, it also saves an OBJ and an MTL. OBJ is the mesh you will import into your modeller. MTL is a material reference for the OBJ.
Note: SPJ is a format ONLY useful for Skn->Obj. It holds the extra data from the SKN file that will be needed to convert it back.
Import the OBJ in your modeller and do your editting. Then export the OBJ again and be SURE to use the SAME filename that you imported. This is of the utmost importance.
Run Skn->Obj again and load the SPJ you saved before. This will also load the OBJ (which you just changed)
Save it as an SKN and it is converted.
This may change after we learn more about the SKN format and other 3D mesh formats.
Maxis and TheSims are Copyright 2000 to Electronic Arts.
All items on this site are Copyright © 2000 - 2004 SimGallery and/or Kelahn.com